


Because what better way to kick off my first portrait of the Genius Project by drawing an actual genius!
In the spirit of my subject this week, Albert Einstein, I am conducting an infallible scientifically scientific science experiment* to see how my drawing skill set improves after actually learning how to draw. But first, I need a hypothesis.
*Not infallible, scientifically scientific, or science. Sorry Mr. Einstein.
Hypothesis: If I learn more about portrait drawing, then I'll get better at portrait drawing! (Results are shocking!)
Like any infallible scientifically scientific science experiment, I need a control. I drew Einstein with no prior knowledge, technique, or any clue how to draw him, just based off of the reference photo. Then, I rated it on the "The Scale That Measures How Objectively** Good and How Objectively** Bad This Drawing Is" Scale™.
**Not objective. Like at all. In fact it's literally the most subjective way to evaluate this.


For more input, I am also including a questionnaire to help evaluate the drawing's position on the spectrum. To make sure everything is completely objective (still not objective at all), I asked for a second opinion.
1. Does it resemble my subject even the slightest bit?
Second Opinion: I mean.... I guess
2. Are the proportions accurate and realistic?
Second Opinion: I'm pretty sure Einstein had a big forehead but other than that...I can tell it's a mammal...
3. How close does it match the reference photo?
Second Opinion: Better than I can do.
4. Would you buy it if sold?
Second Opinion: I think you should pay me for my eye doctor bill.
Wow that's kind of harsh, Second Opinion. But taking everything in to account, let's see what our results are:

I tried asking her. She wouldn't take it.
After the evaluation, my portrait, from what we can all obviously see, struggles quite a bit in the proportion arena, so what I'm looking for this week is a full understanding of the proportions of the standard human face. I will first be learning how to draw a simplified version of it, which I can then build off of. Since most people's features aren't perfectly symmetrical or perfectly aligned and proportional, I'm also looking to be able to adjust these proportions to an image of a real person.
In particular, the jaw of my Einstein has many weird and off peculiarities. It really has no shape beyond the two-dimensional plane and looks nothing like his actual jaw, so I'll be concentrating on the proportions of the jaw, especially, along with the rest of the face.
Now, the hair of my Einstein is also pretty laughable (ramen noodles?) but I don't think I'll be prioritizing hair and the physics of hair, since glitter speed painting doesn't really entail drawing in any extreme detail.
So to reiterate, my goals are to:

Now let's go back to science experiment. My independent variable: learning how to actually draw a portrait.
Now, knowledge (wow!) leads me to believe that the classic techniques for portrait drawing starts with a vertical line down the center, a horizontal middle line, a hairline, etc. But to be frank, I always thought of it as a huge waste of time (not that I have better things to do). Why do that when you can do it by eye?
 Here's a hint: This is why.
After intensely viewing and taking notes on these videos from various channels, I now have several pages about the Loomis Method, named after the famous technique by Andrew Loomis in his book "Drawing the Head & Hands". This method of portrait drawing deconstructs the head into the cranium and the jaw, using guidelines (like the vertical and horizontal lines) to proportion the features of the face. These videos tutorial how to draw the simplified version of the human head, and it was the best place to start building the fundamentals.
So let's break the Loomis Method down:
1. Draw a circle to represent the cranium of the head.
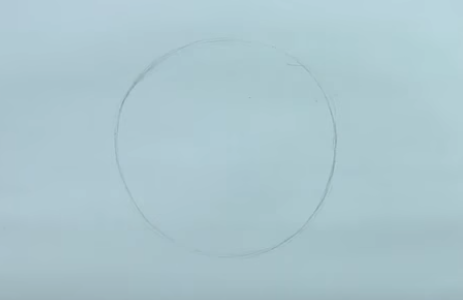
- As I previously mentioned, the Loomis Method deconstructs the human head into the cranium and the jaw, the cranium being circular and the jaw being more of a boxy wedge shape.
- We draw the cranium first because the Loomis Method depicts the jaw as more of an attachment to the cranium, which acts as the base for the entire face.
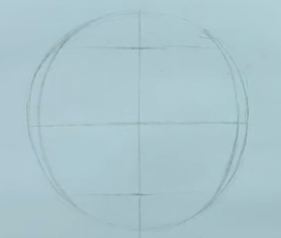
2. Drawing the center and browlines.

- The key for maintaining proportions in the Loomis Method is drawing lines for each of the features at different distances. We begin this by drawing the center line going down vertically, and the browline, which goes across horizontally.
3. Draw the hairline, the line at the bottom of the nose, and the chin

- The hairline is 2/3 of the way up from the nose
- The bottom of the nose ends 2/3 away from the browline

4. Adjust the head shape based on the angle
- Most people' faces aren't rounded, they are more of an oval
- The inner curves trimming down the circle
- It was during research on this step when I found out the slew of people's different face shapes, jaws, eye shapes, which all have different names. Kind of makes me wonder why there's a standard human face shape at all.
5. Attach jaw and touch up rest of sketch.
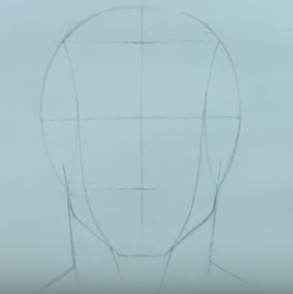
- Draw the jaw from the bottom curve of the cranium. The jaw goes out, then tapers off to meet the chin
- Connect the curves on the sides of the face with the chin
- Draw in the neck and shoulde.r
- And you're done!
- Note the rule of thirds: a general guideline that the hairline to the brow-line, the brow-line to the bottom of the nose, and the bottom of the nose to the chin all have equal increments of space between them.

These are first baby steps to the Loomis Method, and I continued with learning about where to place face features, positioning due to angles, and how to adjust this sketch to any photo. After all my research, I redid my Albert Einstein sketch to test the results:

Personally, I think it's a HUGE difference from before. The proportions, while not perfect, look right, jaw looks more like the image, the nose even looks better. I even did a better job at the hair, which I was not trying to learn this week. It still has a long way to go, but let's put it on the scale.

And if we go back to our "experiment", I can confirm that when you learn about portrait-drawing, you get better at portrait drawing.
I think it's safe to say, I reached all my goals for Week 2!

That's enough science for one day.
I really enjoyed your used of sarcasm. I'd say that the "Scale That Measures How Objectively Good and Objectively Bad This Drawing Is" Scale is slightly subjective. Your drawings definitely weren't bad. It was interesting to see how much your portrait improved after just learning more about portrait drawing.
ReplyDeleteWow, Katie! I can definitely see your improvement with the help of your visuals. Your first attempt was still better than what I could do with hundreds of YouTube Videos. Keep striving for your goals! (And while I don't recommend trying to break into the Louvre, you know what they say: it's not illegal if you don't get caught)
ReplyDeleteWhoa! Awesome post. Love the progress update.
ReplyDeleteYou did a very good job explaining the techniques you were using to proportion out the faces you were drawling. This proportioning seamed similar to some thing da Vinci did but i might be making that up. Perhaps my favorite part was your objective scale. I can't wait to see some of your final products when you finally get around to using the glitter.
ReplyDeleteWOWZAS Katie, I really liked how you formatted your blog like a scientific study. Your use of humor was very well done in this blog; it's like I *know* you on a deeper level now (that sounds weird). The progress you made is very noticeable through the videos you showed us. I can't wait to see you throw glitter at things.
ReplyDelete