

There's been a slight change in plans. The original plan was to do my speed paints with just portraits that were from the neck-up. There's been a new development, however, and I've decided that I was going to try my hand at a full body painting. This presents some new challenges that I can identify right away, and the possibility for new potential problems.
Concern #1: It's going to be hard to make it look good.
All the examples that I've scoured the internet for have been strictly facial portraits:


(Exhibit A, B, & C)
The facial details that allow an audience to really identify and recognize the person being painted is one of the major components of glitter speed painting. And that scares me. I might have to make some adjustments, like a bigger canvas, finer tools, but first, I just want to jump headfirst into the water. If that water happens to be shark-infested or too shallow, or there's rocks at the bottom, I can just figure that out mid-flight.
But all jokes aside, I did want to expand beyond the limitations that glitter speed painting usually has. I want to try something, not only new to me, but maybe new to everyone. And I've also found a reference photo that I just cannot pass up, so I decided to try my hand at it, and if it fails miserably les misérably?, then I'll backtrack and go with plan B.
Have I come up with a plan B yet? Unclear.
Concern #2: This sets my schedule back a bit.
Now, I am very aware that me adding a whole new concept to learn this late in the game is dangerous, needless to say. But, I think it might be totally worth it. And what's the harm in taking risks in the biggest, most important project of the marking period that relies solely on my planning and time management skills?
Looking back now to blog #1, my timeline is more of one week of concentrated learning, and then the rest are just practice, practice, practice! So, I think I can afford to lose one week of maybe much needed practice and try this out.
Now that I've got these concerns said and documented (so I can look back later and realize they were all correct and I've indeed shot myself in the foot), it's time to learn how to sketch the full body.
Like last week, it's time for a control. But no science experiment this time (I've had enough of that). This time, I'm using a random reference photo that I'm not going to be considering for the actual project. The photo I want to use has more complex poses and body maneuvers, so I'm starting with just a basic pose. The place to find that is stock images:

You see, this isn't what I want. Far too intricate, and to be honest, I don't think anything I could draw could live up to the pure artistry of the photo.
And I just wanted to mention that when I pulled this photo from google images, the title of it was "cool guy". Cool guy indeed.

I'm going with this guy! He seems nice enough.
Also, when I saved the image above, the file name--the file name was very weirdly specific?
vvv
This isn't even important to my blog, I just wanted to share the bizarre thing I came across.
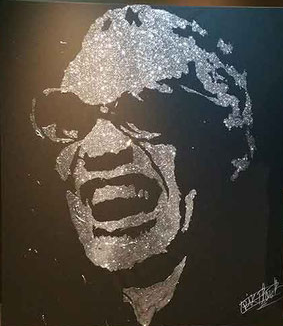
Now that I've chosen my reference photo, the one with a very specific file name, it was time to begin drawing the control. I drew a sketch of the photo before I actually learned anything...and the results were questionable, but had the potential for redemption the path to redemption.

Like I said, has merit, but needs much improvement. So let's put it on my objective scale! My second opinion isn't available this week, she had her own blog to do.
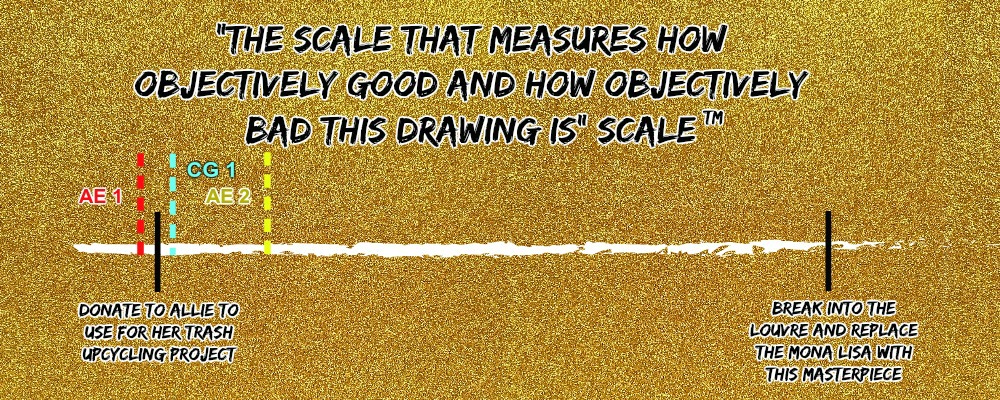
CG 1 stands for "Cool Guy 1".
I have not asked Allie if she would take this drawing yet, but I'm going to presume that she would appreciate it. However, I think it is a far cry from the second Albert Einstein portrait I drew last week, which I do say, I'm moderately proud of.
Now this sketch, I'm not proud of. So to improve, here are my biggest grievances with the sketch that I'm going to work on:

Summing these up into this week's goals, we have:

Today, I focused on the simplified full-body human figure. In the video below, I draw the main sketch, as well as an example of what it looks like when the sketch goes wrong.
I wanted to preface that I have like two or more sketches that didn't quite pan out, just like the last one in the video. Like this one:

But not to worry! Because I got it right, and it was time to move on to drawing the actual reference photo again.
I think that my proportions definitely improved, and I got the general silhouette of him down.
And on my scale, I've placed it here:

While it's proportional, the details don't make it super distinctive, so it's chilling here.
Since I won't be painting people that just stare straight-ahead in a coffin, I need to work on poses. Of the beginner lessons I found, the foundations for drawing different poses feature more of just tips for different categories of poses. But in general, the idea is to sketch out the pose with the same lines and circles at the joints that the full-body figure has. The sketch should also maintain balance, with the center of gravity and center of support aligned in a vertical line.


The points at which the feet (or whatever limb is being balanced on) touches the ground form a line. The midpoint of that line is the center of support.
The center of gravity is behind the belly button, and those two points should be aligned on top of each other so a vertical line can go through them.
It's not just a line they can form either, since she is supporting her weight on her feet and one of her hands, it forms a triangle, and the center point of that triangle serves as her center of support.
The center of support also tends to lean to the side that the most weight is being put on.
The is an over-simplification of the idea, but it's a good starting point to drawing out poses.
I decided to try my hand at the running pose and a pose from a reference photo of my choice:

(Excuse the watermark, I don't know who invited her.)
And I have to say, I'm actually really proud of the sketches I ended up making:
(some issues on YouTube, comment if there are still issues here)
I'm really happy with the end products. They're definitely nowhere near Louvre material, but since I've always struggled with proportions and drawing, the dancing one especially makes me feel like I've actually made some decent progress!

Again, a completely objective scale.

Drawing really isn't as hard as I first thought. It just takes a couple tries to work out the kinks (like that strangely alien looking person), and then it goes alright. In the weeks to come, I'd like to learn the creative, artistic side of making portraits, and get to GLITTER. It's time to lay tarp over every inch of my entire house.
Hope to see you back when I update on the very very messy antics to come.
Research Links:
https://design.tutsplus.com/articles/human-anatomy-fundamentals-basic-body-proportions--vector-18254
Awesome blog entry! Your objective scale is great.
ReplyDeleteFor starters - you're right. That guy IS cool. Secondly, it was pretty cool to see you progress throughout one blog entry. Your goals are pretty lofty, but you probably have enough time to complete them. Happy birthday!
ReplyDelete- Santo
I love the tone of your blogs! It's a great balance between humor and informative, which always makes me want to read more. It's pretty interesting to see how you improve small details of your drawings over the course of one blog. I'm sure that you'll have made something that belongs on the opposite end of your scale by the end of these eight weeks! Can't wait for the glitter!
ReplyDeleteYour blog is a lot of fun to follow! I think you've been doing very well with your sketches, they look pretty good! I can't wait to see what you can do once you start using glitter, but you might want to go outside with it. 2 years ago I was setting up a decoration that was covered in glitter, and I'm pretty sure I'm still vacuuming it out of the carpet. Good luck!
ReplyDelete